life | design | style

Image Slider

I love this time of year. Inspiration is everywhere which makes decorating (for me) from now and the rest of the year so much fun.
I can't wait to show what I come up with either. Especially at Christmas time.
What I'm about to show you is using a way that will work for now till about midnight on Thanksgiving Day. (That's when I tell my husband to grab the boxes of Christmas stuff out cause I'm that ready to start decorating for Christmas.)
Later in like 2 weeks I'll show how to add touches of Halloween.
 I hope you'll enjoy this post with these pictures and hope you get inspired of what I've done (so far) to add a touch of fall. (The yarned pumpkins can be found here for a DIY project.)


Happy Fall Decorating!


In honor of first day of Fall, I'm posting a DIY project to put into your household with this really cute idea - Yarned pumpkins!
 Earlier this week some friends of mine in Interior Design studio came over and decided to have a fall themed DIY project.
 
 
Here is what you need:
 
1: Foamed Pumpkins (Various Sizes/colors)
2. Fall-like Colored Yarn                              
3. Hot Glue Gun                                            
4. A really good Knife                                   
 
You Can get these products at your Local Micheal's or online.
 
First you want to start by cutting the little notch on top. (I'm warning you in advance, it  was kind of a pain )
 
 
Sarah working hard!
 
Next start by gluing the start of the yarn to hold it in place.
 
To wrap you either wrap till you make an X or just wrap in all sort of directions.
(We did both they will look different. If you do the X wrap it gives it a more smooth pattern if you wrap in all sort of directions it gives it more of a strip effect (If your using the more multi colored yarn). Pictures to follow.
 
X wrap - after
 
Wrap in all sorts of directions.
 
Then once you have it (pretty much) completely devoured with yarn, get your notch and hot glue it to the top. Press hard-but not too hard.


This was such a fun and easy project to do with your friends. Start a craft night with yours!
They're so much fun!
 
 
It is yet another Friday folks, and it was another super busy week but a great one. So here is my top five things/events that happened to me.


1. I got my fur-did! Yes I'm that much of a goober that I call my hair my fur. Don't ask me why I just do.


2. Over the weekend, I went to another rodeo with some of the girls (and guy) from ID studio then went to a cowboy bar afterward. It was almost like the interior designer student reunion - or we just took over the place and danced the night away.


3. I got another hooter!!! Refer to this post in order to get the facts of why I them hooters. :)


4. Yesterday, I went to an IIDA event (International Interior Designers Associations), and it was a trade show/meet and greet with some professionals. I learned a lot about really, really cool interior materials for residential and commercial. I hope to attend to it next year as well.


5. At the event I got to talking with a very nice women that represents a material (used to be an interior designer but she traded careers for family purposes -  totally understandable). I got enough courage and asked if it was ok to get her contact info and asked if we could keep in touch. I told her I would love to get some pointers and would like to show her my portfolio as well. She said absolutely! So there, I have a mentor! Yesterday was a pretty good day professionally! :)

How was your week???
I love hooters. No not that kind of hooters! Owls! Gezzzz.
Lately I've been following the trend of the owl figurine for my decor and fashion.
I can't help it they're just so adorable!


Anyway hooters (deal with it, that's what I'm calling 'em) are perfect this time of year. Really I think they can practically go with any home style. But about my hooter, I went into Bath and Body Works to browse and then there he was. Just cute as can be.  I left giving myself a chance to think responsibly about purchasing him but all I got from it was total inspiration to decorate for fall.
So here he is, Mr. Hooter #2.


Here is a how-to or Do-It-Yourself personalized fall wreath to place on your front door OR place it as a focal point in a room for seasonal decor.

So here is what you need:

- Grape vine-like wreath
- A letter - I used the first letter of my last name.
- Spray Paint (Color of your choice. For me I used left over camo green spray paint from my husbands hunting crafts! That's normal, right?)
- A mini bouquet of fall colored flowers (or individual ones if you prefer.)
- Craft wire
- Scissors


It's ok, to just "stuff" the main stem of your mini bouquet. Just as I done below.


Then bend the flowers of your choice of cover.


 Once you've done so, start tackling it down with the craft wire. I'll be honest, it was kind of a pain in the butt.


In the meantime, be sure you spray paint your letter. Once it dries you could sand it with a light sand paper grade to give it more of a vintage look. Then again use your craft wire to attach it to the wreath.


Finally! Hang it on your door! It's super cute and super easy to make. I hope you enjoyed this post. Happy Fall Decorating!


It's another Friday and here my five things that happened to me this week.

1. My husband and I went and did a mini, mini camp trip to Sandpiont and we had a romantic sunset dinner.

2. My first studio project is already done!

3. My husband got me the second Fiftey Shades Darker book.

4. Pumpkin spice lattes finally arrived at Starbucks.

5. My husband will enjoy a glass of port wine. You don't understand - it is a break though.

Hows your week??
Ever wonder what you can do to make your bathroom be more spa-like? Make it more of a home? Make it a retreat?? Well I did say earlier that I would do a post for wall hanging idea from my home (even though I will have some from home) buuuttt the more I thought about it, the more I think my landlord could get a little upset at me for putting a lot more holes in my walls just to demonstrate. However, I did some research to look up inspirational images and give off some tips. So here is part one for your home on hanging decor on your walls.

First of all you need to consider what your material of your wall is; is it cmu (concrete masonry unit or a.k.a cement wall)? is it a dry wall with studs?. Reason being is you may need special equipment in our to do the job like a drill, dry wall nails, cement drill and nails. (Am I being too obvious?)

Any who, part one: Hanging Decor in Bathrooms.


Above the toilet is a great way to display some fun word prints that you can make on photoshop (if you know the program) like the ones shown here or some your favorites quotes that could be found here.
Or another way is to place floating shelves that are displayed below. You could place plants, cute organizers for your cotton balls, q-tips or whatever and place them in mason jars, little vases,.. They don't have to be matchy matchy, unless you want them to be but it gives it just a little more interest when you have a couple of different jars to put them in.


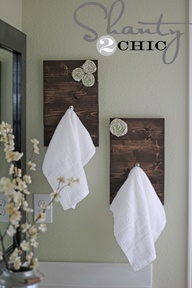
Next is a unique why to place/store your towels, hand towels, and washcloths. It will even make more room under the sink is by placing your towels on DIY wall towel hanging art and for your towels and/or find a vertical wine rack. (And if you don't like the color of it, don't panic, buy some paint at Micheal's- they have a pretty good selection.


Or another idea is to do wall decals - perfect if you live in an apartment to add great interest to your walls when you can't paint. And you can find some great wall decals here on this site.


Lastly a great way to store all of your magazines is by hunting one of these at an antique shop.


Well I hope this helped and really feeling inspired. And don't forget to have fun! Please leave comments and questions you may have. I dare you!!!

Love,

lil' Buck
Hi there!

It's the first day of September and unfortunately these are the last days of summer but don't fret fall is just around the corner.I love fall actually, it means my home will get a little bit more cozier with these upcoming decor tricks and parties DIY to make your home looking like Martha Stewart just stopped by. So bare with me on this next adventure.

Anyway, I clearly got a little side tracked... it is time to update your desktop from smashing magazine! And here are some of my favorites:


Custom Post Signature

Custom Post  Signature